|
The best partner of AXEL together
with Wings3D.
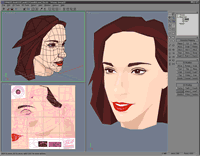
Though there are 2 kinds of projection type UV mappings in
AXEL, Ultimate Unwrap3D ($39.95) makes a more advanced texture expression
possible with AXEL. And, editing of the vertex color becomes easy,
too.
*The support of JPEG compression is scheduled with AXEL.
Texture with AXEL is maximum 512*512pix in the object unit. A model
is divided when the texture of the high resolution is necessary. This
example is 3 division of the head, jacket, trousers.
|
|

Still image |
Management and conversion
Unwrap3D does the management of the attribute and the object.
Turn edge and the mirror copy are possible, too. WRL (texture coordinate
or vertex color), and LWO (surface color) is imported to AXEL, respectively.
|

256pix(78KB)
512pix(234KB) |
Shading test
In order to obtain good shading, the polygonal density and
the angle , and the light need to be adjusted. The polygon is made
into a triangle in this stage in order to adjust the shade. Although
it may be afflicted by an unnecessary highlight and shadow, I think
that most is solvable with turn edge. If still it can't be solved,
a position of the vertex adjusted again. |
|

170KB |
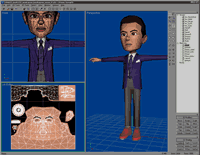
Texture test
UV mapping to the body was completed. Texture
files are two kinds of the head and the body. A surface color
is being used with some of the parts. 2567 polygons.
* The anti-alias of the object is turned on. |
Convert format
Wings3D : Export OBJ
Unwrap3D : Export WRL (VRML 2.0) or LWO (Surface color)
AXEL : Import VRML97(VRML2.0) or LWO.
Attention : Two problems
1) After setting up mapping by Unwrap3D, flip an image vertical.
*UV coordinate does flip vertical after import
in AXEL.
2) Correct 0.01 to 1 at Texture Settings after import in AXEL.
*Unwrap3D exported scale value (1,-1).
|
|